Simple Guide: How To Install Wood Flooring Over A Wooden Subfloor
Posted: February 3, 2025Author – Ryan Palma Owner/CEO Sustainable Lumber Co.
Click on these links to view our extensive line of sustainable hardwood flooring, or to contact us for a pricing quote.
How To Install Wood Flooring Over Wooden Subfloor
 Hardwood flooring brings timeless beauty and value to any home. Whether you opt for engineered or solid hardwood, installing hardwood over OSB (oriented strand board) or other wooden subfloors like plywood requires careful preparation and attention to detail for a flawless and long-lasting result.
Pre-Installation Preparation
1. Choose Your Hardwood:
Engineered Hardwood Wood – Good for all environments, and highly favored in areas with wide fluctuations of humidity. Best option for radiant floor heating since it’s made of several layers of wood, decreasing its chances of shrinking or swelling.
Solid Hardwood – Offers a traditional look and can be sanded and refinished multiple times, but is much more sensitive to moisture.
Blog Post – The Pros and Cons of Engineered and Solid Wood Floors
2. Gather Tools and Materials:
- Hardwood Flooring
- Underlayment (if required by the manufacturer)
- Moisture barrier (for basements or high-moisture areas)
- Nails or adhesive (depending on installation method)
- Nail Gun or Pneumatic Stapler
- Tapping block and pull bar
- Spacers
- Tape measure, utility knife, saw (chop and or table saw)
- Safety gear (goggles, ear protection, knee pads)
3. Acclimate the Wood:
Leave the flooring in the room where it will be installed for at least 72 hours to adjust to the room’s temperature and humidity.
Wooden Subfloor Preparation
1. Inspect the Subfloor:
Ensure it’s flat, dry, and clean. Solid hardwood requires a very flat subfloor to prevent cupping or squeaking. Sand down any high spots or splinters that may be sticking up.
2. Check for Moisture
Use a moisture meter. There should be no more than a 2% difference between the hardwood flooring and the subfloor. Hardwood flooring should only be installed if it’s under 8%.
3 . Install An Underlayment or A Moisture Barrier:
For basements or high-humidity areas, lay down a moisture barrier. For engineered flooring, you might need an underlayment for sound reduction and to provide a smoother base. Mastic glue can also be used when installing, which also acts as a moisture barrier.
Installation Steps
1 Layout Planning:
Decide on the direction of the flooring, typically along the longest wall or towards the main light source.
2. Choose An Installation Type and Begin:
Floating Installation (for Engineered Flooring) – While the floor will float over the wooden subfloor, the planks themselves need to be glued together. Apply wood glue to the top edge of the tongue before fitting into the groove of the adjacent plank. Be careful not to use too much clue, as it may seep out. Begin by laying the first row of planks, and insert the next plank by fitting the tongue into the groove of the previous plank. Use a tapping block or rubber mallet to snugly join the planks together, ensuring a tight fit. Wipe away any excess glue immediately with a damp cloth. As you lay the rows, make sure the end joints are staggered at least 6-8″ away from the adjacent board. This adds strength and stability to the overall floor and is more visually appealing.
Gluing Hardwood to Subfloor (for Engineered and Solid Wood Flooring) – Apply adhesive in a serpentine pattern either directly to the sub-floor or back of the hardwood planks. Lay the planks down, and use weights to ensure good contact while the adhesive sets. Use a tapping block or rubber mallet to snugly join the planks together, ensuring a tight fit. Wipe away any excess glue immediately with a damp cloth. As you lay the rows, make sure the end joints are staggered at least 6-8″ away from the adjacent board. This adds strength and stability to the overall floor and is more visually appealing.
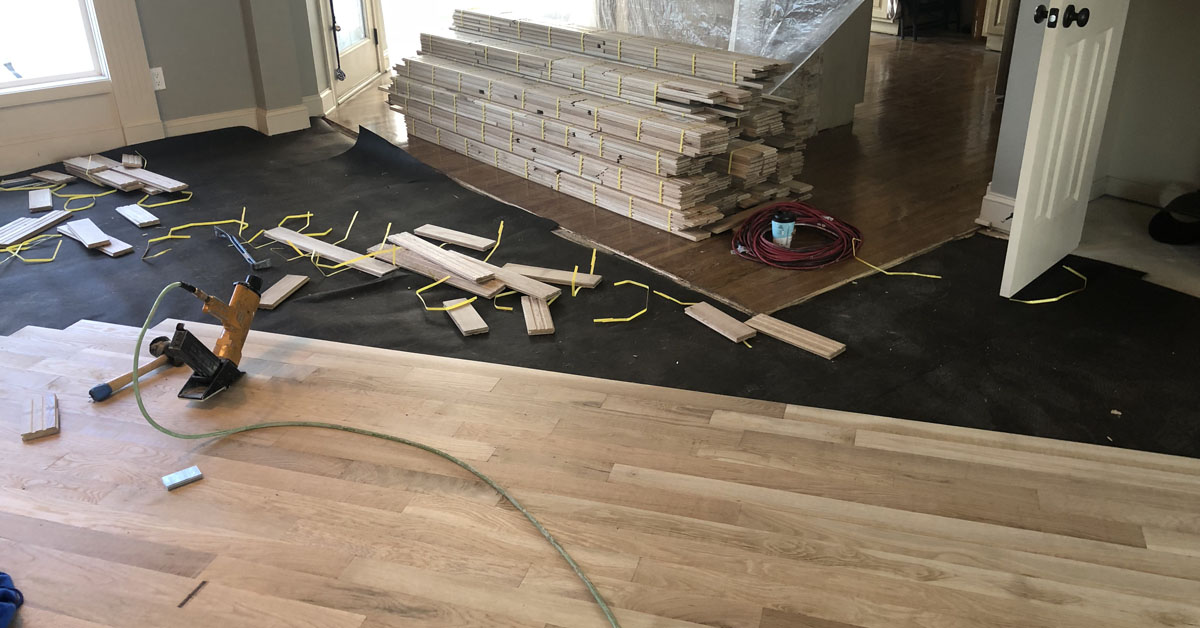
Nailing Down (for Engineered and Solid Wood Flooring) – Use a pneumatic floor nailer using staples, nails, or cleats. Start near a wall while leaving approximately 1/2″ space from the wall for the possibility of expansion. Nail 1″-3″ from the ends and every 6″-8″ in between. Nail at a 45-degree angle through the tongue. As you lay the rows, make sure the end joints are staggered at least 6-8″ away from the adjacent board. This adds strength and stability to the overall floor and is more visually appealing.
3. Continue Row by Row:
Stagger the end joints by at least 6″ in adjacent rows for stability and aesthetic appearance. Cut the last piece of each row to fit and use the remaining piece to start the next row. This will help minimize the amount of waste. You may want to lay out several boards at a time pick the ones you visually prefer and install those in high visibility areas. The pieces you don’t prefer can be installed in areas that may be covered with furniture, rugs, or closets.
4. Handling Transitions:
Use transition pieces such as T-molding, threshold, reducers, and stair nosing where the floor changes from one room to another or meets different flooring types. Stair nosing is used on landings and stair treads.
5. Final Cuts:
The last row of flooring may need to be ripped with a table saw to fit. Make sure to leave approximately 1/2″ space from the wall to allow for expansion. This last row may need to be faced nailed since the tongue may be cut off.
6. Expansion Gaps and Finishing Touches:
The 1/2″ expansion gaps near the walls will be covered once the baseboards are installed. Thoroughly clean all sawdust and glue that may have squeezed out before it sets.
Post-Installation
Allow the Floor to Settle – Avoid heavy furniture or excessive traffic for a few days if adhesive is used.
Final Inspection – Check for any loose boards, and ensure all seams are tight and secure.
Maintenance – Follow the manufacturer’s guidelines for cleaning and maintenance.
By using our simple guide on how to install solid wood flooring over a wood subfloor, you can achieve a beautiful hardwood floor that enhances your home’s aesthetics and increases its market value. Remember, while DIY can be rewarding, please consult with a professional local installer for larger areas or more complex installations.
Contact Us:
Our knowledgeable and educated staff is here to answer any additional questions you may have. Please call us today for a free quote: Ph# 406.642.7120 or click here to submit an inquiry online. We look forward to working with you on your next project!